


The general consensus regarding children and herbal teas is that they are completely safe and a much better alternative to giving them fruit juice, which I agree with. A herbal tea with a smidgen of honey is far better than sugar laden (natural or not) fruit juice for hydrating your child. I also think that its a great idea to introduce their palettes to the taste of teas early on in life as well.
Oct 4, 2014
Oct 1, 2014
Water balloon with a glow stick

Put a water balloon with a glow stick on the inside in a stocking and hang from trees or ceiling.
I found this idea at http://phoenixtreasures.net/home
Water balloon with a glow stick
Put a water balloon with a glow stick on the inside in a stocking and hang from trees or ceiling.
I found this idea at http://phoenixtreasures.net/home
Easy Meatloaf Recipe – All food Recipes
Easy Meatloaf Recipe – All food Recipes
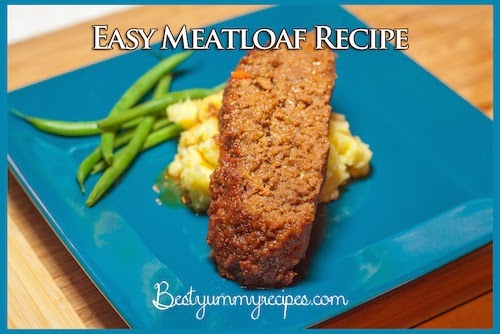

Easy Meatloaf Recipe
My favorite meatloaf
Moist, juicy, delicious meatloaf with some surprising sauce ingredients that might just make you reconsider your opinion of meatloaf in general!
Ingredients
Glaze:
• 1.5 cups apple cider vinegar
• 1.5 cups light brown sugar
• 1 TBSP yellow mustard
• ¼ cup ketchup
Meatloaf:
• 1 small onion, finely diced
• 2 whole large eggs
• 1 egg yolk
• ¼ cup milk
• ½ cup ketchup
• 2 TBSP A-1 steak sauce
• ½ tsp salt
• ¼ tsp ground black pepper
• ½ tsp dry mustard
• ½ tsp onion powder
• ¼ tsp garlic powder
• 1 tsp dried parsley
• 1 TBSP minced garlic
• ¼ cup panko bread crumbs
• 1 sleeve crushed saltine crackers
• 2.5 lbs 80/20 ground beef
Instructions
- Place glaze ingredients in a saucepan and mix well. Heat to simmering, and stir frequently while you mix up the loaf ingredients.
- Finely chop the onion and mix in all of the other loaf ingredients except the ground beef. Stir until well combined, and then add ground beef and mix until fully incorporated.
- Press down into large oven-safe pan, and make space between the edge of the loaf and the pan.
- Pour glaze over the loaf, leaving room for the glaze to mix with the fat and juices from the beef. Keep the remaining glaze warm on the stove until the loaf is done cooking.
- Bake the meatloaf at 375 for approximately 1 hour, or until the internal temperature reaches 160 degrees. Remove from oven, and carefully pour the glaze/sauce mixture from the baking dish into the saucepan. Whisk together well.
- Slice the loaf and serve with mashed potatoes and a vegetable, spooning some of the sauce/glaze mixture over the individual slices of meatloaf and on the potatoes as well.
Easy Meatloaf Recipe – All food Recipes
Easy Meatloaf Recipe – All food Recipes
Easy Meatloaf Recipe
My favorite meatloaf
Moist, juicy, delicious meatloaf with some surprising sauce ingredients that might just make you reconsider your opinion of meatloaf in general!
Ingredients
Glaze:
• 1.5 cups apple cider vinegar
• 1.5 cups light brown sugar
• 1 TBSP yellow mustard
• ¼ cup ketchup
Meatloaf:
• 1 small onion, finely diced
• 2 whole large eggs
• 1 egg yolk
• ¼ cup milk
• ½ cup ketchup
• 2 TBSP A-1 steak sauce
• ½ tsp salt
• ¼ tsp ground black pepper
• ½ tsp dry mustard
• ½ tsp onion powder
• ¼ tsp garlic powder
• 1 tsp dried parsley
• 1 TBSP minced garlic
• ¼ cup panko bread crumbs
• 1 sleeve crushed saltine crackers
• 2.5 lbs 80/20 ground beef
Ingredients
Glaze:
• 1.5 cups apple cider vinegar
• 1.5 cups light brown sugar
• 1 TBSP yellow mustard
• ¼ cup ketchup
Meatloaf:
• 1 small onion, finely diced
• 2 whole large eggs
• 1 egg yolk
• ¼ cup milk
• ½ cup ketchup
• 2 TBSP A-1 steak sauce
• ½ tsp salt
• ¼ tsp ground black pepper
• ½ tsp dry mustard
• ½ tsp onion powder
• ¼ tsp garlic powder
• 1 tsp dried parsley
• 1 TBSP minced garlic
• ¼ cup panko bread crumbs
• 1 sleeve crushed saltine crackers
• 2.5 lbs 80/20 ground beef
Instructions
- Place glaze ingredients in a saucepan and mix well. Heat to simmering, and stir frequently while you mix up the loaf ingredients.
- Finely chop the onion and mix in all of the other loaf ingredients except the ground beef. Stir until well combined, and then add ground beef and mix until fully incorporated.
- Press down into large oven-safe pan, and make space between the edge of the loaf and the pan.
- Pour glaze over the loaf, leaving room for the glaze to mix with the fat and juices from the beef. Keep the remaining glaze warm on the stove until the loaf is done cooking.
- Bake the meatloaf at 375 for approximately 1 hour, or until the internal temperature reaches 160 degrees. Remove from oven, and carefully pour the glaze/sauce mixture from the baking dish into the saucepan. Whisk together well.
- Slice the loaf and serve with mashed potatoes and a vegetable, spooning some of the sauce/glaze mixture over the individual slices of meatloaf and on the potatoes as well.
Loaded Baked Potato & Chicken Casserole – All food Recipes
Loaded Baked Potato & Chicken Casserole – All food Recipes


Loaded Baked Potato & Chicken Casserole
serves 4
Ingredients
3 – 4 medium russet potatoes, scrubbed and diced
(about 1.5 lbs. or 4 1/2 cups)
1 lb. boneless, skinless chicken breasts, diced
4 slices bacon, cooked crisp, cooled and crumbled
1 1/2 cups shredded cheddar cheese
4 green onions, sliced (green parts only for low-FODMAP/low-fructose)
1/2 teaspoon salt
1/2 teaspoon ground black pepper
1/2 cup heavy cream
2 tablespoons unsalted butter, cut into small pieces
Instructions
Heat oven to 350 degrees F. Lightly grease a 9″ x 9″ baking pan or casserole dish.
Spread half of the diced potatoes in bottom of pan. Place the diced chicken breasts evenly on top. Season chicken with 1/4 teaspoon each salt and pepper. Sprinkle with half the bacon crumbles, 1/2 cup of the cheese, and half the green onions.
Spread the remaining diced potatoes on top, followed by the remaining bacon, another 1/2 cup cheese, remaining green onions and another 1/4 teaspoon each salt and pepper. Pour heavy cream over top of casserole and then dot with the butter. Cover with aluminum foil and bake in the preheated oven for 1 hour. Uncover and bake another 30 minutes. In the last few minutes of baking, sprinkle with the remaining 1/2 cup cheddar cheese and bake until melted. Serve.
Loaded Baked Potato & Chicken Casserole – All food Recipes
Loaded Baked Potato & Chicken Casserole – All food Recipes
Loaded Baked Potato & Chicken Casserole
serves 4
Ingredients
3 – 4 medium russet potatoes, scrubbed and diced
(about 1.5 lbs. or 4 1/2 cups)
1 lb. boneless, skinless chicken breasts, diced
4 slices bacon, cooked crisp, cooled and crumbled
1 1/2 cups shredded cheddar cheese
4 green onions, sliced (green parts only for low-FODMAP/low-fructose)
1/2 teaspoon salt
1/2 teaspoon ground black pepper
1/2 cup heavy cream
2 tablespoons unsalted butter, cut into small pieces
(about 1.5 lbs. or 4 1/2 cups)
1 lb. boneless, skinless chicken breasts, diced
4 slices bacon, cooked crisp, cooled and crumbled
1 1/2 cups shredded cheddar cheese
4 green onions, sliced (green parts only for low-FODMAP/low-fructose)
1/2 teaspoon salt
1/2 teaspoon ground black pepper
1/2 cup heavy cream
2 tablespoons unsalted butter, cut into small pieces
Instructions
Heat oven to 350 degrees F. Lightly grease a 9″ x 9″ baking pan or casserole dish.
Spread half of the diced potatoes in bottom of pan. Place the diced chicken breasts evenly on top. Season chicken with 1/4 teaspoon each salt and pepper. Sprinkle with half the bacon crumbles, 1/2 cup of the cheese, and half the green onions.
Spread the remaining diced potatoes on top, followed by the remaining bacon, another 1/2 cup cheese, remaining green onions and another 1/4 teaspoon each salt and pepper. Pour heavy cream over top of casserole and then dot with the butter. Cover with aluminum foil and bake in the preheated oven for 1 hour. Uncover and bake another 30 minutes. In the last few minutes of baking, sprinkle with the remaining 1/2 cup cheddar cheese and bake until melted. Serve.
Spread half of the diced potatoes in bottom of pan. Place the diced chicken breasts evenly on top. Season chicken with 1/4 teaspoon each salt and pepper. Sprinkle with half the bacon crumbles, 1/2 cup of the cheese, and half the green onions.
Spread the remaining diced potatoes on top, followed by the remaining bacon, another 1/2 cup cheese, remaining green onions and another 1/4 teaspoon each salt and pepper. Pour heavy cream over top of casserole and then dot with the butter. Cover with aluminum foil and bake in the preheated oven for 1 hour. Uncover and bake another 30 minutes. In the last few minutes of baking, sprinkle with the remaining 1/2 cup cheddar cheese and bake until melted. Serve.
Sep 24, 2014
Sep 18, 2014
DIY Flagstone Path Tutorial | Home Design, Garden & Architecture Blog Magazine
DIY Flagstone Path Tutorial | Home Design, Garden & Architecture Blog Magazine


 Yes I copy and paste over and over But I try to always add the link to the orginal post .
DIY Flagstone Path Tutorial
Having a nice path in your garden can make a big difference. It is the first thing you see before entering a garden and can raise big expectations. That’s why a nice and clean pathway is really important, it reflects the outlook of the whole garden. You can make this pathway curvy or straight and add different kinds of decorations to it. To make a really nice flagstone pathway, follow the instructions below.

First of all it is very important to clean the area where you will be making the path. Clean the surface, remove all weeds and make it a smooth area. Then choose the materials you will be working with, such as concrete, stones and gravel. You can also use sand, but is not as resistant as the other materials used for construction. You will need to install a bender board edging and lay down landscape fabric. This will prevent the weeds growing and will keep your path clean. Lay down sand on the fabric and arrange it smoothly. Use water to moisten the sand while working with it. Use a drum roller and press it on the sand to make it firm. Now start adding the stepping stones and apply pressure with your hands in order to secure them. Use gravel to fill the cracks between the stones. There you have it, an easy way to create a beautiful and welcoming path.


DIY Flagstone Path Tutorial | Home Design, Garden & Architecture Blog Magazine
DIY Flagstone Path Tutorial | Home Design, Garden & Architecture Blog Magazine
Yes I copy and paste over and over But I try to always add the link to the orginal post .
DIY Flagstone Path Tutorial
Having a nice path in your garden can make a big difference. It is the first thing you see before entering a garden and can raise big expectations. That’s why a nice and clean pathway is really important, it reflects the outlook of the whole garden. You can make this pathway curvy or straight and add different kinds of decorations to it. To make a really nice flagstone pathway, follow the instructions below.
First of all it is very important to clean the area where you will be making the path. Clean the surface, remove all weeds and make it a smooth area. Then choose the materials you will be working with, such as concrete, stones and gravel. You can also use sand, but is not as resistant as the other materials used for construction. You will need to install a bender board edging and lay down landscape fabric. This will prevent the weeds growing and will keep your path clean. Lay down sand on the fabric and arrange it smoothly. Use water to moisten the sand while working with it. Use a drum roller and press it on the sand to make it firm. Now start adding the stepping stones and apply pressure with your hands in order to secure them. Use gravel to fill the cracks between the stones. There you have it, an easy way to create a beautiful and welcoming path.
Sep 17, 2014
How to Make Mini Pies in a Cupcake Tin – All food Recipes
How to Make Mini Pies in a Cupcake Tin – All food Recipes
Mini Pies in a Cupcake Tin
Mini Pies in a Cupcake Tin

Ingredients
- 2 (2-count) packages Pillsbury refrigerated pie crusts
- 4 cups (or 2 21-ounce cans) pie filling (cherry, blueberry, apple, peach, etc.)
- 1 egg, whisked
Directions
- Preheat oven to 350 degrees F. Grease 12 muffin cups with cooking spray.
- Roll out a single pie crust on a flat surface. Use a large cookie
cutter or any sort of circular lid to cut out a 4-inch circle of dough.
Press each dough circle into the bottom of a muffin tin so that a tiny
rim of dough remains sticking out the top. Repeat with remaining dough
to fill all 12 muffin cups. - Fill each cup with about 1/4 cup pie filling, or until the filling nearly fills the cups.
- Use the remaining dough to cover the tops of each pie. To make a
lattice crust, use a knife or pizza cutter to cut out thin strips of
dough, then lace together to form a lattice. To make a standard crust,
cut out a circle of dough just large enough to cover the top of the
crust. Use your fingers to gently press the top crust to the bottom
crust until they stick together and no gaps remain. - Use a pastry brush to brush the tops of each pie with the whisked
egg. Then bake for 25-30 minutes, or until the crust is lightly golden
and the filling begins to bubble. - Remove and let cool for at least 15 minutes. Then very carefully use
a knife to loosen the edges of each pie and gently lift each pie out.
Serve immediately or cover and refrigerate.
How to Make Mini Pies in a Cupcake Tin – All food Recipes
How to Make Mini Pies in a Cupcake Tin – All food Recipes
Mini Pies in a Cupcake Tin
Mini Pies in a Cupcake Tin
Ingredients
- 2 (2-count) packages Pillsbury refrigerated pie crusts
- 4 cups (or 2 21-ounce cans) pie filling (cherry, blueberry, apple, peach, etc.)
- 1 egg, whisked
Directions
- Preheat oven to 350 degrees F. Grease 12 muffin cups with cooking spray.
- Roll out a single pie crust on a flat surface. Use a large cookie
cutter or any sort of circular lid to cut out a 4-inch circle of dough.
Press each dough circle into the bottom of a muffin tin so that a tiny
rim of dough remains sticking out the top. Repeat with remaining dough
to fill all 12 muffin cups. - Fill each cup with about 1/4 cup pie filling, or until the filling nearly fills the cups.
- Use the remaining dough to cover the tops of each pie. To make a
lattice crust, use a knife or pizza cutter to cut out thin strips of
dough, then lace together to form a lattice. To make a standard crust,
cut out a circle of dough just large enough to cover the top of the
crust. Use your fingers to gently press the top crust to the bottom
crust until they stick together and no gaps remain. - Use a pastry brush to brush the tops of each pie with the whisked
egg. Then bake for 25-30 minutes, or until the crust is lightly golden
and the filling begins to bubble. - Remove and let cool for at least 15 minutes. Then very carefully use
a knife to loosen the edges of each pie and gently lift each pie out.
Serve immediately or cover and refrigerate.
Sep 16, 2014
Herbal Teas for Children
 Image via Wikipedia
 I found this at...
http://thesupermom.com/are-herbal-teas-ok-for-kids
The general consensus regarding children and herbal teas is that they are completely safe and a much better alternative to giving them fruit juice, which I agree with. A herbal tea with a smidgen of honey is far better than sugar laden (natural or not) fruit juice for hydrating your child. I also think that its a great idea to introduce their palettes to the taste of teas early on in life as well.
Herbal Teas for Children
Image via Wikipedia I found this at...
http://thesupermom.com/are-herbal-teas-ok-for-kids
The general consensus regarding children and herbal teas is that they are completely safe and a much better alternative to giving them fruit juice, which I agree with. A herbal tea with a smidgen of honey is far better than sugar laden (natural or not) fruit juice for hydrating your child. I also think that its a great idea to introduce their palettes to the taste of teas early on in life as well.
Subscribe to:
Posts (Atom)